10/1/2023
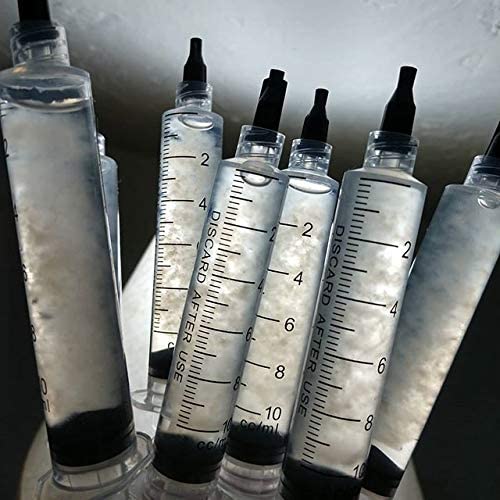
A liquid culture syringe is a sterile container that contains a suspension of mycelium in a liquid nutrient broth. LC syringes are used to inoculate grain spawn, agar plates, and other substrates with mushroom mycelium.
Materials needed
- A liquid culture syringe
- A sterile inoculation needle
- A sterile substrate (grain spawn, agar plate, etc.)
- A sterile work area
Instructions
- Flame sterilize the inoculation needle.
- Remove the cap from the LC syringe and insert the inoculation needle.
- Inject 1-2 mL of LC into the sterile substrate.
- Replace the cap on the LC syringe and dispose of the inoculation needle in a sharps container.
Tips
- Be careful not to touch the needle to the sides of the LC syringe or to any other surface.
- Inject the LC slowly and carefully.
- Make sure that the LC is distributed evenly throughout the sterile substrate.
- If you are inoculating grain spawn, make sure to shake the grain spawn after inoculation to distribute the mycelium evenly.
Troubleshooting
- If the mycelium does not grow on the sterile substrate, it is possible that the LC was contaminated.
- If the mycelium grows slowly or weakly, it is possible that the injection was not done properly.
Conclusion
Liquid culture syringes are a convenient and efficient way to inoculate mushroom spawn and other substrates. By following the instructions above, you can successfully use LC syringes to grow mushrooms at home.
Additional tips for using LC syringes with Tiger Sawgill
- Tiger Sawgill is a relatively fast-growing mushroom, so you may only need to inject 0.5-1 mL of LC into the sterile substrate.
- Tiger Sawgill mycelium can be sensitive to contamination, so it is important to use sterile technique when inoculating the sterile substrate.
- Tiger Sawgill mycelium can grow well on a variety of substrates, including grain spawn, agar plates, and straw.
Safety
It is important to use sterile technique when working with LC syringes to prevent contamination. Contamination can lead to the growth of unwanted microorganisms, which can ruin your mushroom grow.
It is also important to dispose of sharps (such as inoculation needles) properly. Sharps can cause injury if they are not disposed of properly.
Hello, my fellow fungi fanatics! Welcome back to your favorite mushroom medley on the web, where we cover everything from the peatiest compost to the shiitakiest shiitakes (and, trust me, those can get very shiitake!). Now, today we’re diving deep into the swampy heart of the mycelial mystery itself. Brace yourselves, because it’s time to talk about… liquid cultures! That’s right – today we’re gonna make like a mycelium smoothie and get blended into the fantastical world of liquid cultivation.
Now, you might be wondering: “Why should I, a perfectly sane mushroom maven, wish to mix up some mysterious mushroom mulch?” Good question, dear reader. Let’s think of it like this: if mushroom cultivation was a big Broadway musical, the liquid culture would be the undervalued but oh-so-essential understudy – not always in the spotlight, but without it, the show quite literally can’t go on.
Creating a liquid culture is a bit like making your own sourdough starter, but for mushrooms! It’s where the magic begins, the primal soup from which we’ll coax our wonderful mushrooms to life. And no, despite what the name may imply, it doesn’t involve witchcraft, wizardry, or even a single incantation (unless you count “please don’t contaminate, please don’t contaminate” as a magic spell).
So, whether you’re a seasoned cultivator or a fledgling fungus farmer, grab your gloves, don your lab coat, and let’s get ready to delve into the exciting, dungeons world of liquid cultures – where we’re sure to have a spore-some time!
Stay tuned and prepare to be inoculated with knowledge. Your path to becoming a fun-guy (or gal) starts here, and it’s going to be a trip you won’t forget! And remember, there’s no room for truffle in our cultivation castle! So hold on to your Petri dishes, it’s about to get fungi-tactically fascinating!
What Is Liquid Culture?
Get ready to bust out your metaphorical mycology monocle, dear readers, because it’s time to study liquid cultures under our educational microscope. By the time we’re through, you’ll know your liquid cultures like a squirrel knows acorns.
A liquid culture, in essence, is a solution teeming with mushroom mycelium – the fungal equivalent of the root system of a plant. This fungal phantasmagoria is suspended in a nutrient-rich liquid that acts as a kind of mushroom ‘smoothie’. This smoothie gives the mycelium all the sustenance it needs to grow and prosper, like a mycologist’s version of an all-you-can-eat buffet.
But why, you might be thinking, should I bother with this extra step? Why not just dive straight into the substrate? Well, that’s a bit like asking why we should bother cooking our food when we could just chow down on raw ingredients. Technically possible? Yes. What is the best approach for a gourmet result? Hardly.
Liquid cultures serve a multitude of purposes in the mushroom cultivation process. They act as a bridge between spore germination and colonization of a growth substrate (that’s the mushroom version of moving from kindergarten to college).
Liquid cultures allow for rapid, vigorous growth and expansion of your chosen mycelium. You’re giving the mycelium a head start in a safe, nutrient-rich environment before introducing it to the substrate where it’ll eventually fruit. This is like training an athlete with the best diet and exercise regimen before the big race.
Plus, with liquid cultures, you can store and multiply your favorite strains, almost like creating a mushroom library or a fungal family tree. It’s like having an army of mycelial soldiers ready for deployment at a moment’s notice.
Learning to master liquid cultures, thus, is an invaluable skill in your mycology toolkit. It’s a game-changer that will take your cultivation to the next level, and it’s an investment that pays dividends in the form of prolific, healthy mushrooms.
So, buckle up your hyphal seatbelts and sterilize your syringes, my mycelial mates. It’s time to cultivate some knowledge and grow our understanding. We’re about to embark on a journey into the depths of the fungal kingdom and let me tell you, it’s quite a ride. After all, this isn’t just a hobby, it’s a lifestyle – and as we like to say around here, “The mycelium is always right!”
Making Liquid Culture: An Overview
Hold onto your hyphae, my mycology mavens, because we’re about to embark on a magical mystery tour into the mycelium matrix. Buckle up for a super-concentrated, CliffsNotes-style ride through the steps of making a liquid culture. Ready? Let’s rock this fungal frolic!
1. Select Your Strain: Not all mushrooms are created equal. Select a strain that’s known for its vitality and vigor. You’re looking for the Usain Bolt of the fungal world.
2. Craft Your Culture Medium: Concoct a nutrient-rich potion for your mycelium. Popular options include dextrose, malt extract, or honey dissolved in water.
3. Sterilize, Sterilize, Sterilize: Pour your concoction into a mason jar and apply a lid with a self-healing injection port and a gas exchange filter. Pressure cook it to sterilize. Remember, cleanliness is next to fungus-ness in this game.
4. Inoculate Your Culture: Once cool, inject a spore syringe or mycelium from a previous culture into the sterile liquid medium. This is where the real magic happens, so whisper encouraging words to your mycelium (optional but recommended).
5. Shake It Up: Gently agitate the jar to distribute the mycelium. Picture yourself as a mushroom mixologist, stirring up the cocktail of the century.
6. Incubate and Wait: Store your jar in a warm, dark place and wait for the mycelium to colonize the liquid. Patience is a virtue, dear reader. Your mycelium is in no hurry, so neither should you be.
7. Harvest Time: Once your liquid is cloudy with mycelium, you’re ready to rock! Use this culture to inoculate your mushroom substrate and start the real fun!
And there you have it! The “Inception” version of the liquid culture process. Now, each of these steps can (and will) be unpacked into more detail, so stick around. We’ll delve into the nitty-gritty to make sure you can navigate this process like a truffle pig in a French oak forest.
Stay tuned, dear readers. We’re only just scratching the surface of the mycelial mystery that is liquid culture!
Mushroom Liquid Culture Recipe
As we embark on this tutorial, we aim to provide comprehensive, step-by-step instructions on how to create a liquid culture utilizing a 4% carbohydrate broth. This formulation has been chosen for its optimal balance of nutrients, promoting robust and healthy mycelial growth.
To ensure this process is as straightforward and efficient as possible, we’ve provided links below for all the required materials. These resources will equip you with everything you need to successfully create a mushroom liquid culture at home.
We believe in the importance of understanding and following the process precisely. It’s not only essential for successful cultivation but also for maintaining safe and sanitary practices.
- 1L water
- 40g light malt extract.
- 1g brewers yeast (optional)
- Magnetic stirrer or marbles
- 4 x 16oz (500ml) mason jars.
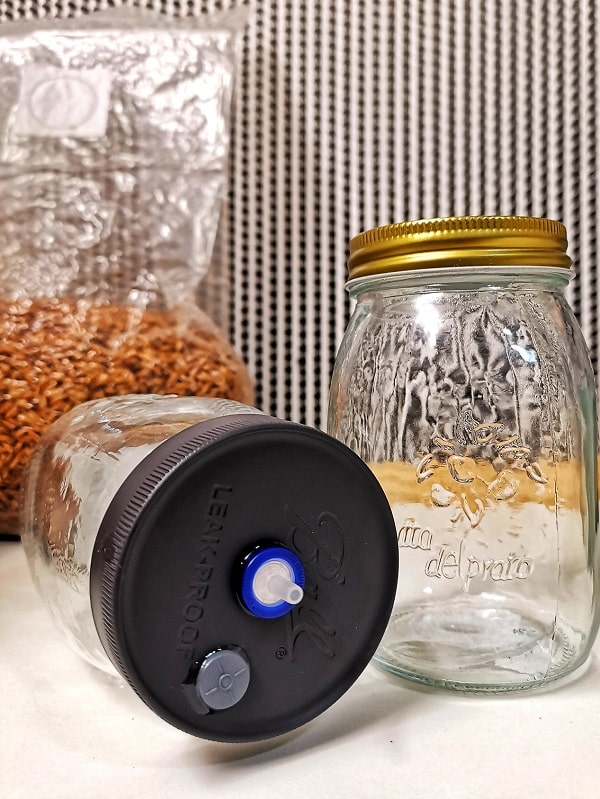
- 4 x modified lids for mushroom growing.
- Pressure Cooker
- Aluminium foil
Lid-Eology Revolutionized: Our Reusable Modified Lids For Mushroom Growing!
Optimized Design: These modified lids are engineered with the mushroom cultivator in mind. They boast filters for fresh air exchange and self-healing injection ports, providing your mycelium with the perfect balance of oxygen and protection.
Versatile Fit: Whether you’re team ‘Wide Mouth’ or ‘Regular Mouth’, these lids have got you covered. Designed to fit both types of mason jars, they ensure a snug, secure seal no matter your jar style preference.
Reusable and Sustainable: Say goodbye to single-use lids! These modified lids are built to last, providing a sustainable option for your mushroom-growing needs. Simply sterilize between uses and they’re good as new.
Ideal for Grain Spawn and Liquid Culture: Looking to produce high-quality grain spawn or liquid culture? These lids offer the ideal conditions for your cultures to colonize and thrive, setting the stage for a bountiful harvest.
Simple to Use: These lids are as user-friendly as they come. The self-healing injection ports make inoculation a breeze, and the built-in filters take care of fresh air exchange without any extra effort from you.
Boosted Yields: By providing optimal growing conditions, our reusable modified lids can help enhance the productivity of your mushroom growing setup. Expect healthier mycelium and more abundant harvests!
Step 1. Measure Ingredients
Now that we’ve set the stage for our liquid culture journey, let’s move on to one of the most critical steps – measuring and preparing our liquid culture broth.
The broth acts as the nutrient-rich foundation on which your mycelium will flourish. Its composition is key to promoting healthy, vigorous growth. In this tutorial, we’ll be using light malt extract as our main nutrient source, with an optional addition of brewer’s yeast to give your mycelium an extra vitality boost.
Here’s how to measure your materials:
2. Water: You’ll need 1 liter (or 1000 milliliters) of water. This serves as the base of your liquid culture. Distilled or purified water is recommended to avoid any potential contaminants that could hinder mycelium growth.
3. Light Malt Extract: Weigh out 40 grams of light malt extract. Use a digital kitchen scale for the most accurate measurements. This carbohydrate is a favorite food source for many types of mycelium and will help fuel their development.
4. Brewer’s Yeast (Optional): For those of you wanting to go the extra mile, consider adding 1 gram of brewer’s yeast. This can give your mycelium an additional nutrient source, promoting even more vigorous growth. Again, be sure to use a digital scale for precise measurement.
Remember, accuracy is key here. Exact measurements ensure the right nutrient balance for your mycelium, helping it to thrive and grow robustly.
Step 2. Bottle & Cover
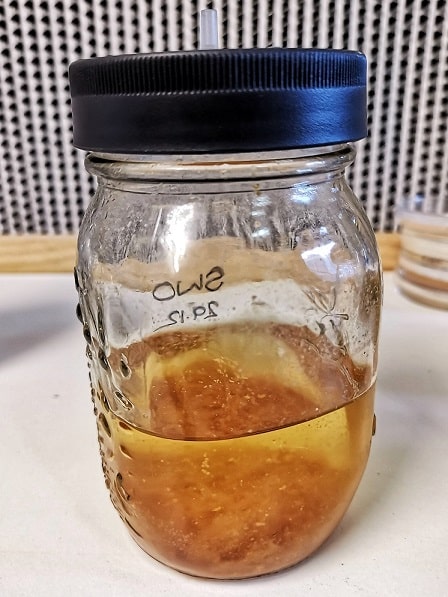
With our liquid culture broth measured and mixed, it’s time to fill our mason jars or media bottles. This stage also involves adding a simple yet crucial element – a magnetic stir rod or a glass marble, which we’ll use to break apart the mycelium in the later steps.
2.1. Prepare Your Containers: Start by ensuring your mason jars or media bottles are clean and dry. Each container will act as a mini nursery for your mycelium, so cleanliness is crucial. Depending on the size of your containers, this recipe should be enough for 3-4 standard mason jars or 2 larger media bottles.
2.2. Insert the Stir Rod or Glass Marble: Place a magnetic stir rod or a small, clean glass marble into each jar. These items will help us agitate and distribute the mycelium in our liquid culture down the line.
2.3. Pour in the Broth: Carefully pour your liquid culture broth into each jar, filling them about halfway. Remember, the mycelium needs room to grow, so avoid the temptation to overfill.
2.4. Seal Your Containers: Seal each jar with a lid that includes a self-healing injection port and a gas exchange filter. This type of lid allows for inoculation with a syringe and necessary gas exchange for the mycelium while keeping unwanted contaminants out.
2.5. Final Check: Ensure each lid is secured tightly. This step is critical for maintaining sterility and preventing contamination during the pressure cooking process that’s coming next.
Remember, patience and precision are your best friends in this step. By setting up your jars correctly, you’re creating an environment where your mycelium can flourish and your liquid cultures can thrive. Up next, we’ll be discussing the sterilization process in detail. Stay with us on this exciting journey into the world of mushroom cultivation!
Step 3. Sterilise
Sterilization is an absolutely vital step in preparing your liquid culture. Proper sterilization eliminates potential contaminants that could impede mycelium growth, or worse, cause harmful bacterial or mold cultures to form. Here’s how to go about sterilizing your mason jars or media bottles filled with liquid culture broth:
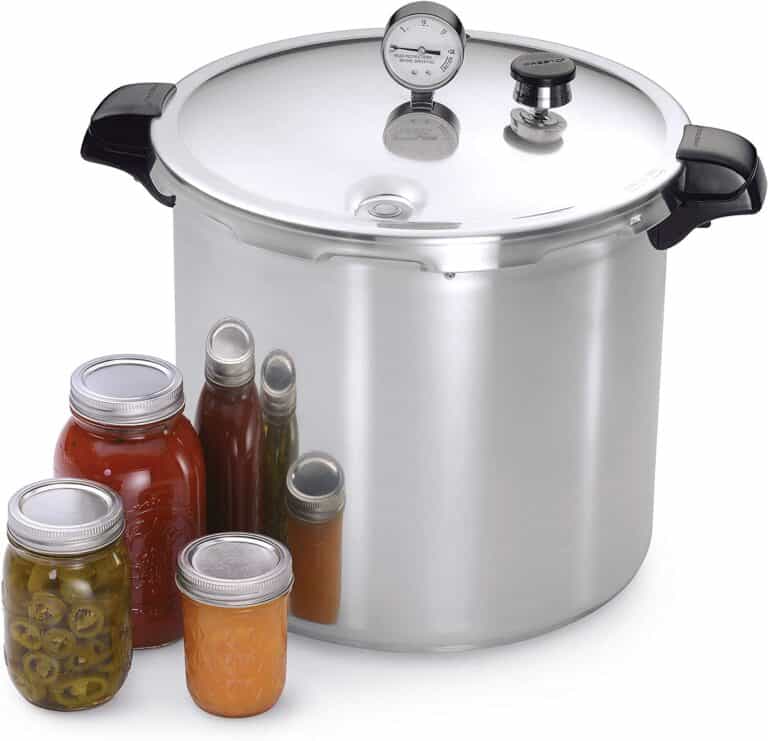
3.1. Prepare Your Pressure Cooker: Place a rack or cloth on the bottom of your pressure cooker. This acts as a buffer, preventing the jars from direct contact with the heat source, which could otherwise cause them to crack.
3.2. Load Your Jars: Gently place your filled and sealed jars into the pressure cooker. Be sure to space them evenly and avoid letting them touch each other or the walls of the cooker. This ensures an even heat distribution during sterilization.
3.3. Add Water: Pour in enough water so that it comes up about 1 inch on the sides of your jars. The water creates steam in the pressure cooker, which is crucial for sterilization.
3.4. Secure the Lid: Close the lid of your pressure cooker and secure it following the manufacturer’s instructions. Ensure that the pressure valve is closed or covered, depending on your cooker’s design.
3.5. Heat and Pressurize: Turn your heat source on high until your pressure cooker reaches a pressure of 15 psi. Once this pressure is achieved, reduce the heat to the lowest setting that will still maintain 15 psi.
3.6. Sterilize: Maintain this pressure for 30 minutes to fully sterilize your liquid culture broth. Be sure to monitor the pressure cooker regularly during this time for safety reasons and to ensure the pressure remains consistent.
3.7. Cool Down: After the sterilization period, turn off the heat and let your pressure cooker cool down naturally. Do not attempt to speed up the process by opening the pressure valve or removing the lid – rapid changes in temperature or pressure can cause your jars to break.
3.8. Unloading: Once the pressure cooker is fully cooled, you can safely remove the lid. Carefully take out your jars using jar tongs or oven mitts, and set them aside to cool completely.
Remember, safety is paramount during this step. Always follow the manufacturer’s instructions for your pressure cooker, and never try to open the cooker while it’s still under pressure.
Next, we’ll be going through the process of inoculating your sterile liquid cultures with your chosen mushroom strain.
Unlock the full potential of your mushroom cultivation with our Presto 23qt Pressure Canner. This rugged, high-capacity workhorse is just the tool you need for efficient, reliable sterilization of your substrates.
Large Capacity: With a robust 23-quart capacity, our Presto Pressure Canner can handle larger loads, helping you prepare multiple jars of substrate in one go. Now, that’s what we call mushroom efficiency!
Unmatched Sterilization: Sterilization is crucial in mushroom cultivation to ward off contaminants. Our pressure canner ensures thorough, high-temperature sterilization, creating an immaculate environment for your mycelium to thrive.
Built to Last: Durability is the name of the game with the Presto Pressure Canner. Made with high-grade materials, it’s designed to withstand the test of time, serving your mushroom cultivation needs for years to come.
User-Friendly Design: It’s not just powerful, it’s also easy to use! With a simple, intuitive design, even beginners can quickly get to grips with operating our Presto Pressure Canner.
Safety Features: Your safety is paramount to us. Equipped with a pressure dial gauge for precise pressure control and a locking lid system, the Presto Pressure Canner prioritizes safe operation.
Boost your mushroom cultivation efforts with the Presto 23qt Pressure Canner – because when it comes to successful sterilization, we believe in no half-measures!
Now that we have our sterile liquid culture broth ready, we’re on to the exciting stage of inoculation. This is where we introduce our chosen mushroom strain into the nutrient-rich broth to promote the growth of mycelium. Let’s look at how we can inoculate our sterile liquid culture broth using either a liquid culture syringe or a mycelium grown on agar.
4.1. Prepare Your Inoculum: If you’re using a liquid culture syringe, give it a good shake to evenly distribute the mycelium. If you’re using mycelium grown on agar, prepare a small piece about the size of a grain of rice using a sterilized scalpel.
4.2. Flame Sterilize Your Needle or Scalpel: Use a torch or alcohol lamp to heat the needle of your syringe or the blade of your scalpel until it glows red. This kills off any potential contaminants. Allow it to cool before proceeding.
4.3. Inoculate Your Broth: If you’re using a syringe, simply insert the needle through the self-healing injection port of your mason jar or media bottle and depress the plunger, expelling around 1-2ml of the liquid culture into your broth. If you’re using an agar culture, open the lid of your container just enough to slide the piece of agar in, and then quickly reseal it. Remember, speed is key to minimizing the risk of contamination.
4.4. Shake It Up: Once your broth has been inoculated, give your jar a gentle shake to distribute the mycelium throughout the liquid.
4.5. Incubate: Store your jar in a dark place at a temperature appropriate for the type of mushroom you are growing. Typically, this will be room temperature for many common strains, but check the specific requirements for your chosen mushroom.
Remember, sterility is paramount in this process. Always work in a clean environment and ensure your tools are properly sterilized to minimize the risk of contamination.
In the coming days, you’ll start to see the mycelium growth in your jars. In the next part of our tutorial, we will guide you through what to expect and the next steps in your mycelium cultivation journey.
Step 5. Agitate & Oxygenate
Once your inoculated liquid culture begins to show signs of mycelium growth, it’s important to regularly agitate the mixture. Agitation helps to break up the developing mycelial mass and distribute it evenly throughout the liquid medium. This ensures the nutrients are efficiently consumed, and also results in a liquid culture that’s easier to draw into a syringe for inoculating substrates.
Here are the steps to agitate your developing liquid culture:
5.1. Check for Mycelium Growth: Observe your liquid culture daily. When you start seeing cloudy white areas forming, that’s the mycelium growing. You’ll want to start the agitation process as soon as you see these signs.
5.2. Shake or Stir: The method of agitation depends on what you place in your jars before sterilization. If you used a glass marble, simply give the jar a good shake. Make sure the lid is secured tightly, then shake the jar vigorously enough to break up the mycelium and distribute it throughout the liquid.
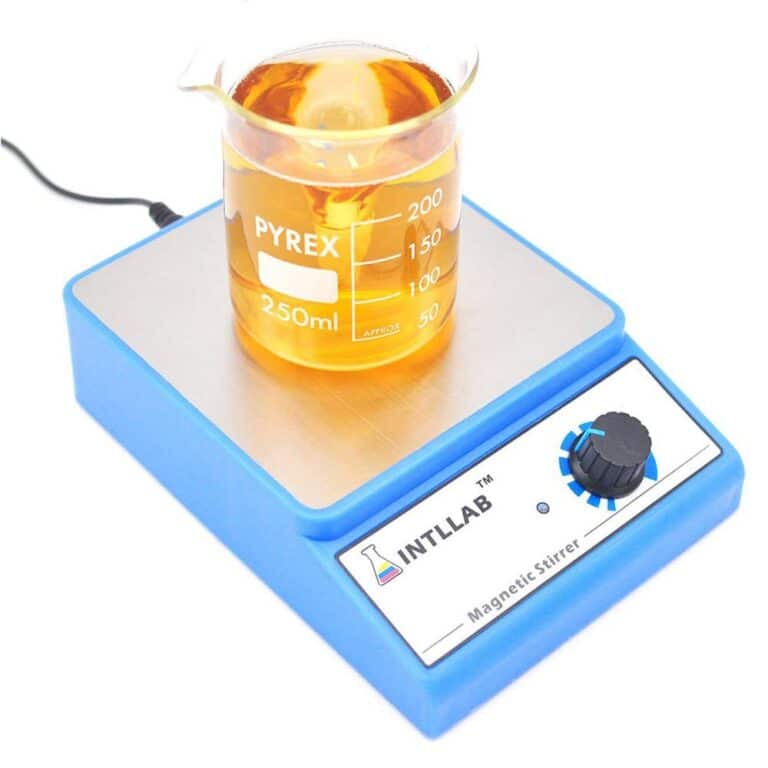
If you used a magnetic stir bar, you’ll need a magnetic stirrer. Place your jar on the stirrer and turn it on a moderate speed. This creates a vortex in the liquid that will break apart the mycelial mass and evenly distribute it.
5.3. Repeat as Necessary: You should repeat this process at least once a day until you’re ready to use your liquid culture. Regular agitation helps maintain a uniform distribution of mycelium throughout the liquid culture, promoting healthy, vigorous growth.
Remember, when shaking the jars, do it firmly but carefully. It’s easy to get carried away and end up with a cracked jar or a hand covered in mycelial broth.
Using A Magnetic Stirrer
Unleash the potential of your liquid cultures with our top-tier Magnetic Stirrer! Precision-engineered for the demands of gourmet mushroom cultivation, this stirrer is a must-have tool for any serious mycologist.
Designed for functionality and durability, our Magnetic Stirrer ensures a smooth, consistent vortex that gently but efficiently breaks apart mycelial masses. This promotes even distribution of mycelium throughout your liquid culture, enhancing nutrient uptake and ensuring robust, vigorous growth.
Our Magnetic Stirrer is not only easy to use, but it’s also a clean, hands-off way to agitate your cultures, reducing the risk of contamination. With adjustable stirring speeds, it offers you complete control, catering to a wide range of fungal species and cultivation requirements.
Say goodbye to the manual shaking and say hello to the ease and efficiency of our Magnetic Stirrer. Harness the power of magnetism to propel your mushroom cultivation to new heights. This isn’t just a tool; it’s your secret weapon in the world of mushroom cultivation. Order now, and stir your way to fungal success!
Step 6. Using The Liquid Culture
With your liquid culture fully colonized and the mycelium eager to expand its territory, it’s time to put it to work. This part of the process is known as inoculation, and it involves introducing the mycelium to your chosen substrate – the food source on which your mushrooms will grow. Here’s a step-by-step guide on how to proceed:
6.1 Prepare Your Work Area: As always, cleanliness is of the utmost importance. Work in a clean area, and sterilize your surfaces with a 10% bleach solution or 70% isopropyl alcohol. Make sure your substrate jars or bags are close at hand and that your liquid culture syringe is sterilized and ready to use.
6.2. Agitate the Liquid Culture: Shake your liquid culture jar to disperse the mycelium throughout the liquid. This is where the magnetic stir rod or glass marble you added earlier comes in handy. Agitating the jar breaks up the mycelium, creating a uniform suspension that’s easy to draw up into your syringe.
6.3. Load Your Syringe: Insert your sterilized syringe into the self-healing injection port on the jar lid. Draw the mycelium-laden liquid into the syringe. Be gentle – you don’t want to create bubbles, which can lead to spore clumping.
6.4. Inoculate Your Substrate: Using the same syringe, inject the mycelium suspension into your substrate jars or bags via their injection ports. The general guideline is to use 1-2 milliliters of liquid culture per pound of substrate.
6.5. Seal and Store: After inoculation, seal your substrate containers tightly and store them in a clean, warm environment away from direct sunlight. Over the coming days and weeks, you’ll see the mycelium begin to colonize the substrate.
6.6. Monitor Progress: Regularly check your substrate jars or bags for signs of colonization. Healthy mycelium will appear as a white, web-like growth. If you notice any other colors, such as green or black, this could be a sign of contamination.
Congratulations! You’ve now embarked on the exciting phase of watching your mushrooms grow. In the upcoming weeks, with a little care and a lot of patience, you’ll see the fruits (or, more accurately, fungi) of your labor.